최근 교회 설교 관리 시스템을 개발하면서 텍스트 에디터가 필요했다. 단순한 텍스트 입력이 아닌, 다양한 서식과 폰트를 지원하는 풍부한 에디터가 필요했고, 여러 옵션을 검토한 끝에 React Quill을 선택하게 되었다. React Quill은 강력한 기능과 커스터마이징 옵션을 제공하면서도, 사용법이 직관적이어서 개발하기 편했던것 같다! 😊
1. React Quill 설치 및 기본 설정
필자는 먼저 필요한 패키지를 설치했다.
npm install react-quill
# or
yarn add react-quill
다음으로는 기본적인 에디터 컨포넌트를 만들기 위해 다음과 같이 코드를 작성했다.
import React, { Component } from 'react';
import ReactQuill from 'react-quill';
import 'react-quill/dist/quill.snow.css';

class SermonEditor extends Component {
    constructor(props) {
        super(props);
        this.state = {
            editorHtml: '<p style="font-size: 16px;"></p>'
        };
    }

    handleChange = (content) => {
        this.setState({ editorHtml: content });
        if (this.props.onChange) {
            this.props.onChange(content);
        }
    }

    render() {
        return (
            <ReactQuill
                theme="snow"
                onChange={this.handleChange}
                value={this.state.editorHtml}
                placeholder="내용을 입력하세요..."
            />
        );
    }
}
2. 폰트 설정하기
필자는 한글 텍스트 에디터가 필요했던지라 한글 폰트를 지원하기 위해 Google Fonts를 사용하기로 했다. 먼저 font.css 파일을 만들어 필요한 폰트들을 import 했다.
@import url('https://fonts.googleapis.com/css2?family=Noto+Sans+KR:wght@400;500;700&display=swap');
@import url('https://fonts.googleapis.com/css2?family=Nanum+Gothic:wght@400;700&display=swap');
@import url('https://fonts.googleapis.com/css2?family=Nanum+Myeongjo:wght@400;700&display=swap');
@import url('https://fonts.googleapis.com/css2?family=Nanum+Pen+Script&display=swap');
@import url('https://fonts.googleapis.com/css2?family=Poor+Story&display=swap');
@import url('https://fonts.googleapis.com/css2?family=Jua&display=swap');
그리고 Quill 에디터에서 사용할 수 있도록 폰트를 등록했다.
const Font = ReactQuill.Quill.import('formats/font');
Font.whitelist = [
    'noto-sans-kr',
    'nanum-gothic',
    'nanum-myeongjo',
    'nanum-pen-script',
    'poor-story',
    'jua'
];
ReactQuill.Quill.register(Font, true);
🚨주의사항으로는 프로젝트내에 폰트파일이 없으면 에디터내에서 적용이 되지를 않는다!! 이것때문에 필자도 많이 해맸다. 🚨
3. 툴바 커스터마이징
다음으로는 에디터의 툴바를 원하는 대로 구성하기 위해 modules 옵션을 설정했다.
modules = {
    toolbar: {
        container: [
            ['bold', 'italic', 'underline', 'strike'],
            [{ size: Size.whitelist }],
            [{ font: Font.whitelist }],
            [{ header: [1, 2, 3, 4, 5, 6, false] }],
            [{ align: ['', 'center', 'right', 'justify'] }],
            [{ color: [] }, { background: [] }],
            [{ list: 'ordered' }, { list: 'bullet' }],
            [{ indent: '-1' }, { indent: '+1' }],
            ['blockquote'],
        ],
    },
};
폰트 크기도 세밀하게 조정할 수 있도록 변수를 설정하여 값을 지정해주었다.
const Size = ReactQuill.Quill.import('formats/size');
Size.whitelist = ['8px', '9px', '10px', '11px', '12px', '14px', '16px', '18px', '24px', '36px', '48px', '72px', '96px'];
Size.defaultSize = '16px';
ReactQuill.Quill.register(Size, true);
4. 에디터 스타일링 하기
필자는 styled-components를 사용해서 에디터의 스타일을 커스터마이징했다. 특히 한글 폰트 이름을 보기 좋게 표시하는 것에 신경썼다. (한글 전용 에디터를 만들고 싶었기에)
const EditorWrapper = styled.div`
    .ql-editor {
        min-height: 400px;
        font-size: 16px !important;
        line-height: 1.5;
    }

    // 폰트 선택기 한글화
    .ql-snow .ql-picker.ql-font .ql-picker-label[data-value='noto-sans-kr']::before,
    .ql-snow .ql-picker.ql-font .ql-picker-item[data-value='noto-sans-kr']::before {
        content: '노토 산스' !important;
        font-family: 'Noto Sans KR';
    }

    // ... 다른 폰트들도 같은 방식으로 설정

    // 폰트 스타일 적용
    .ql-font-noto-sans-kr {
        font-family: 'Noto Sans KR', sans-serif;
    }

    // ... 다른 폰트 스타일들
`;
5. 완성된 에디터를 사용해보자
최종적으로 완성된 에디터를 실제 폼에서 사용할 때는 다음과 같이 구현했다.
const AddSermonPage = () => {
    const [sermonData, setSermonData] = useState({
        contentText: '',
        // ... 다른 필드들
    });

    const handleEditorChange = (content) => {
        setSermonData((prev) => ({
            ...prev,
            contentText: content,
        }));
    };

    return (
        <FormContainer>
            {/* ... 다른 폼 필드들 */}
            <EditorSection>
                <Label>설교 내용</Label>
                <SermonEditor onChange={handleEditorChange} />
            </EditorSection>
        </FormContainer>
    );
};
6. 완성본!!!
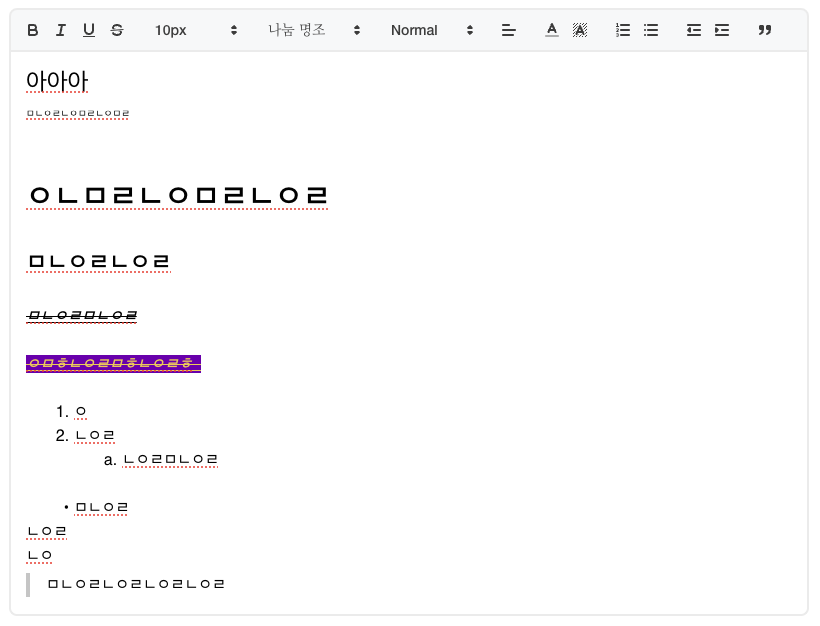
React Quill을 사용하면서 느낀 점은, 오픈소스 라이브러리를 잘 활용하면 복잡한 기능도 효율적으로 구현할 수 있다는 것이다.
또 개인적으로 신기했던 점은 개발자가 오픈소스 라이브러리를 활용하여 원하는 대로 커스터마이징 할 수 있다는 것이 놀라웠던 것 같다!!!
근데 왜 react-draft-wysiwyg 과 같은 유명한 라이브러리를 사용하지 않았냐? 라는 질문에는 이렇게 답해주고 싶다.
react-draft-wysiwyg는 한글 지원은 하지만 그에 대한 폰트 사이즈, 글꼴체 적용 등 툴바 기능에 대한 적용 자체가 한글에는 너무 아쉬웠다. 그나마 React Quill이 지원을 너무 잘 해주는 것 같아 한글 텍스트 에디터를 원하시는 분들은 react quill을 개인적으로 추천한다!
'React' 카테고리의 다른 글
| [React] Error: can't resolve './reportWebVitals' 문제 해결 (1) | 2025.01.17 |
|---|---|
| [React] useState로 상태 관리하기 (1) | 2025.01.16 |
| [React] Firebase를 통한 전화번호 인증 시스템 구현하기 (0) | 2025.01.14 |
| [React] React 19 출시 : 무엇이 해결되었을까? (0) | 2025.01.11 |
| [React] React Suspense란? (2) | 2024.12.05 |